

Setalah sebelumnya kita sudah selesai melakukan installasi dan konfigurasi mail server, selanjutnya kita akan melakukan installasi dan konfigurasi WebMail server. Untuk menginstall dan konfigurasi Web Mail Server, di debian sudah harus terinstall
- Web Server dan berjalan dengan baik. Di sini say menggunakan apache2
- DataBases Server dan berjalan dengan baik.
- Mail Server dan berjalan dengan baik.
Lankah pertama adalah kita harus membuat user baru untuk rouncube
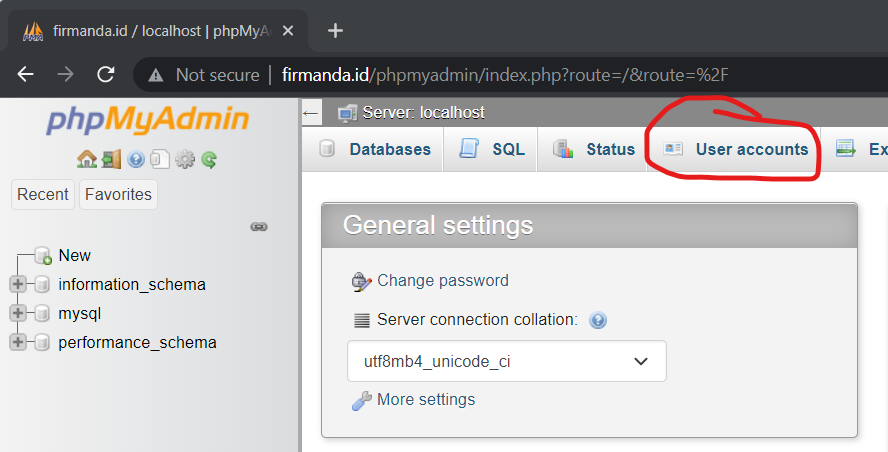
1. Buka phpmyadmin anda. Kemudian klik menu user account
2. Klik add user account

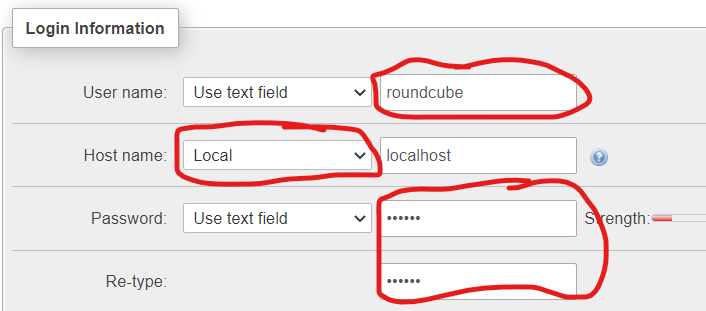
3. Masukkan Username rouncube, pilih hostname Local kemudian masukkan password tkj123
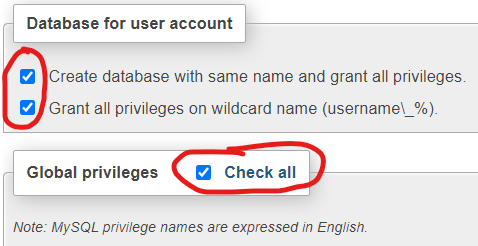
4. Centang pada area seperti berikut ini
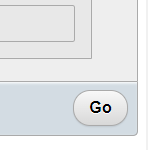
5. Scroll halaman sampai bawah sendiri, kemudian klik go
User baru untuk rouncube sudah kita buat. selanjutnya kita lakukan installasi dan konfigurasi rouncube
1. Masukkan perintah berikut ini
root@tkj:~# apt install roundcube
Reading package lists... Done
Building dependency tree
Reading state information... Done
The following additional packages will be installed:
  aspell aspell-en dbconfig-common fontconfig-config fonts-dejavu-core libaspell15 libfontconfig1 libgd3 libjbig0
  libjpeg62-turbo libtiff5 libwebp6 libxpm4 php-auth-sasl php-gd php-intl php-mail-mime php-net-sieve php-net-smtp
  php-net-socket php-pspell php7.3-gd php7.3-intl php7.3-pspell roundcube-core roundcube-mysql
Suggested packages:
  aspell-doc spellutils dbconfig-mysql | dbconfig-pgsql | dbconfig-sqlite | dbconfig-sqlite3 | dbconfig-no-thanks
  libgd-tools roundcube-plugins php-net-ldap2 php-crypt-gpg php-net-ldap3
The following NEW packages will be installed:
  aspell aspell-en dbconfig-common fontconfig-config fonts-dejavu-core libaspell15 libfontconfig1 libgd3 libjbig0
  libjpeg62-turbo libtiff5 libwebp6 libxpm4 php-auth-sasl php-gd php-intl php-mail-mime php-net-sieve php-net-smtp
  php-net-socket php-pspell php7.3-gd php7.3-intl php7.3-pspell roundcube roundcube-core roundcube-mysql
0 upgraded, 27 newly installed, 0 to remove and 0 not upgraded.
Need to get 0 B/6,395 kB of archives.
After this operation, 23.8 MB of additional disk space will be used.
Do you want to continue? [Y/n]
2. Pilih yes
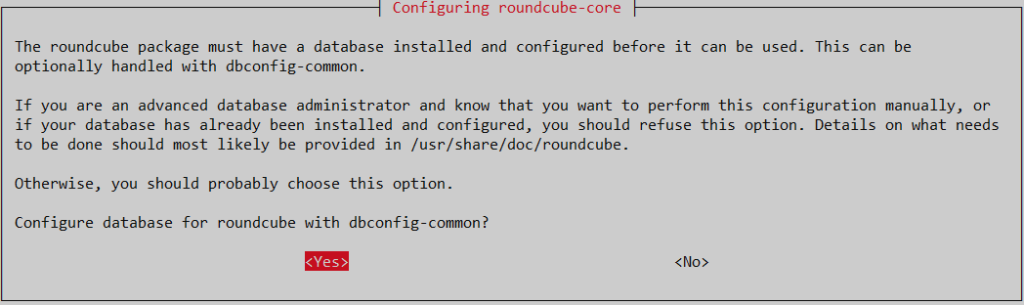
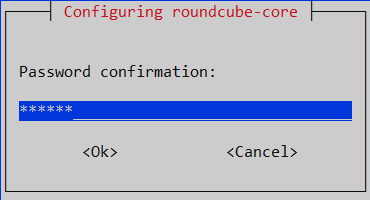
3. Masukkan password rouncube yang telah kita buat tadi yaitu tkj123. Kemudian masukkan kembali
4. Selanjutnya Lakukan perubahan pada file config.inc.php
root@tkj:~# nano /etc/roundcube/config.inc.php5. Rubah beberapa baris berikut ini
// The IMAP host chosen to perform the log-in.
// Leave blank to show a textbox at login, give a list of hosts
// to display a pulldown menu or set one host as string.
// To use SSL/TLS connection, enter hostname with prefix ssl:// or tls://
// Supported replacement variables:
// %n - hostname ($_SERVER['SERVER_NAME'])
// %t - hostname without the first part
// %d - domain (http hostname $_SERVER['HTTP_HOST'] without the first part)
// %s - domain name after the '@' from e-mail address provided at login screen
// For example %n = mail.domain.tld, %t = domain.tld
//$config['default_host'] = '';
$config['default_host'] = 'firmanda.id';

// SMTP server host (for sending mails).
// Enter hostname with prefix tls:// to use STARTTLS, or use
// prefix ssl:// to use the deprecated SSL over SMTP (aka SMTPS)
// Supported replacement variables:
// %h - user's IMAP hostname
// %n - hostname ($_SERVER['SERVER_NAME'])
// %t - hostname without the first part
// %d - domain (http hostname $_SERVER['HTTP_HOST'] without the first part)
// %z - IMAP domain (IMAP hostname without the first part)
// For example %n = mail.domain.tld, %t = domain.tld
//$config['smtp_server'] = 'localhost';
$config['smtp_server'] = 'firmanda.id';

// SMTP port (default is 25; use 587 for STARTTLS or 465 for the
// deprecated SSL over SMTP (aka SMTPS))
$config['smtp_port'] = 25;

// SMTP username (if required) if you use %u as the username Roundcube
// will use the current username for login
//$config['smtp_user'] = '%u';
$config['smtp_user'] = '';

// SMTP password (if required) if you use %p as the password Roundcube
// will use the current user's password for login
//$config['smtp_pass'] = '%p';
$config['smtp_pass'] = '';
6. Seting Virtualhost untuk subdomain mail.firmanda.id
root@tkj:~# cd /etc/apache2/sites-available/
root@tkj:/etc/apache2/sites-available# cp 000-default.conf mail.conf
root@tkj:/etc/apache2/sites-available# nano mail.conf
7. Rubah menjadi seperti berikut ini
<VirtualHost *:80>
        # The ServerName directive sets the request scheme, hostname and port that
        # the server uses to identify itself. This is used when creating
        # redirection URLs. In the context of virtual hosts, the ServerName
        # specifies what hostname must appear in the request's Host: header to
        # match this virtual host. For the default virtual host (this file) this
        # value is not decisive as it is used as a last resort host regardless.
        # However, you must set it for any further virtual host explicitly.
        #ServerName www.example.com

        ServerAdmin admin@firmanda.id
        ServerName mail.firmanda.id
        ServerAlias mail.firmanda.id
        DocumentRoot /var/lib/roundcube

        # Available loglevels: trace8, ..., trace1, debug, info, notice, warn,
        # error, crit, alert, emerg.
        # It is also possible to configure the loglevel for particular
        # modules, e.g.
        #LogLevel info ssl:warn

        ErrorLog ${APACHE_LOG_DIR}/error.log
        CustomLog ${APACHE_LOG_DIR}/access.log combined

        # For most configuration files from conf-available/, which are
        # enabled or disabled at a global level, it is possible to
        # include a line for only one particular virtual host. For example the
        # following line enables the CGI configuration for this host only
        # after it has been globally disabled with "a2disconf".
        #Include conf-available/serve-cgi-bin.conf
</VirtualHost>

# vim: syntax=apache ts=4 sw=4 sts=4 sr noet
8. Tutup dan simpan kemudian enable dan restart service apache dan maail
root@tkj:/etc/apache2/sites-available# a2ensite mail.conf
Enabling site mail.
To activate the new configuration, you need to run:
  systemctl reload apache2
root@tkj:/etc/apache2/sites-available# service apache2 restart
root@tkj:/etc/apache2/sites-available# service postfix restart
root@tkj:/etc/apache2/sites-available# service dovecot restart
Uji coba hasil konfigurasi dengan mencoba kirim email dari user info kepada user admin.
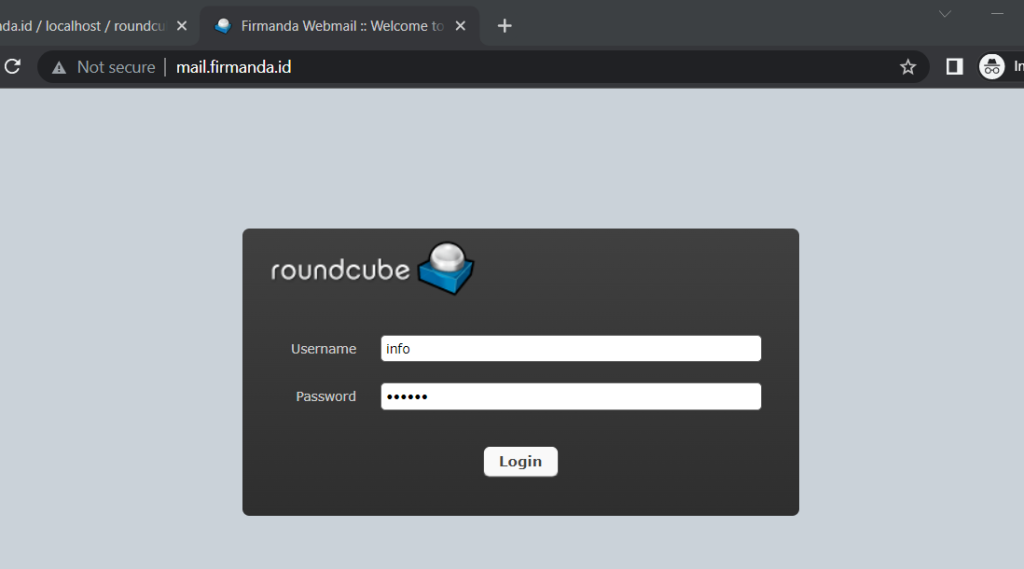
1. Buka alamat mail.firmanda.id dari browser pada client, kemudian login dengan user info dan password tkj123 yang telah dibuat pada materi mail server sebelumnya
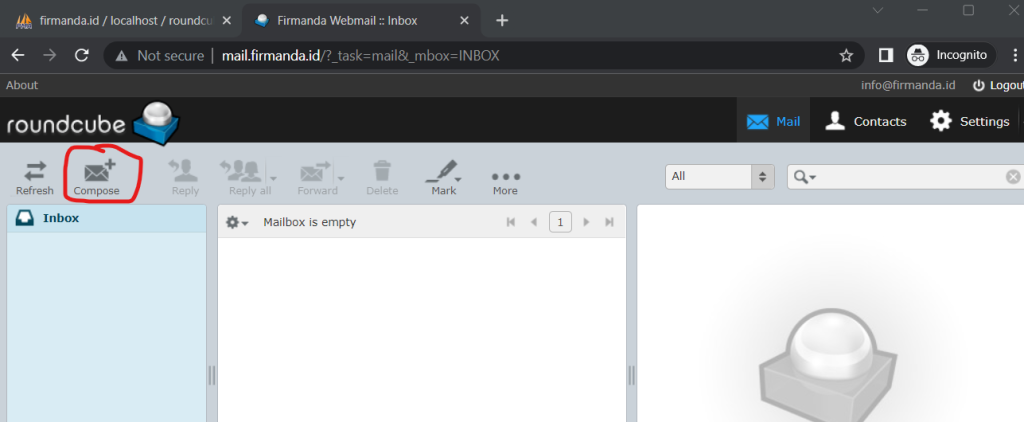
2. Tampilan awal setelah login. Klik compose untuk membuat pesan baru
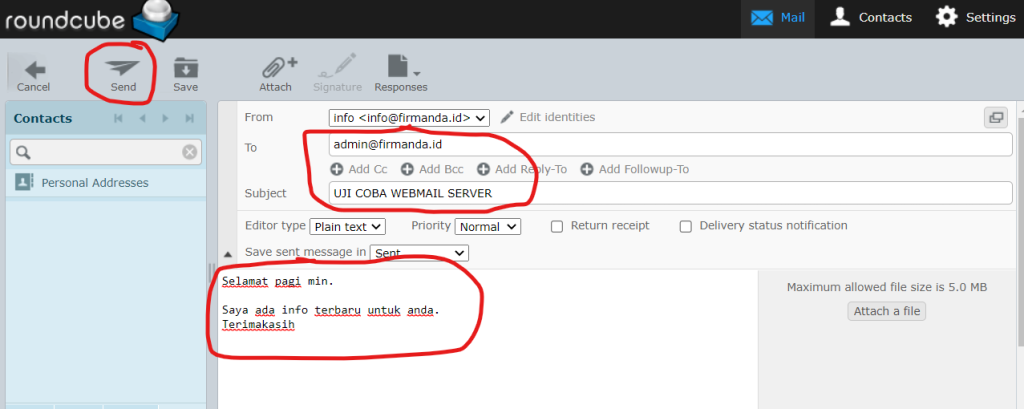
3. Masukkan alamat email yang dituju yaitu admin@firmanda.id. Kemudian masukkan judul email dan isi pesan email. Terakhir klik tombol send
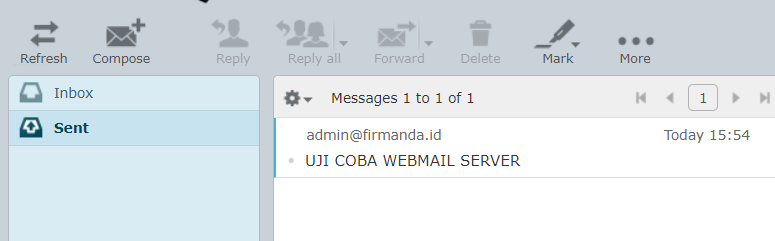
5. logout dari akun info@firmanda.id
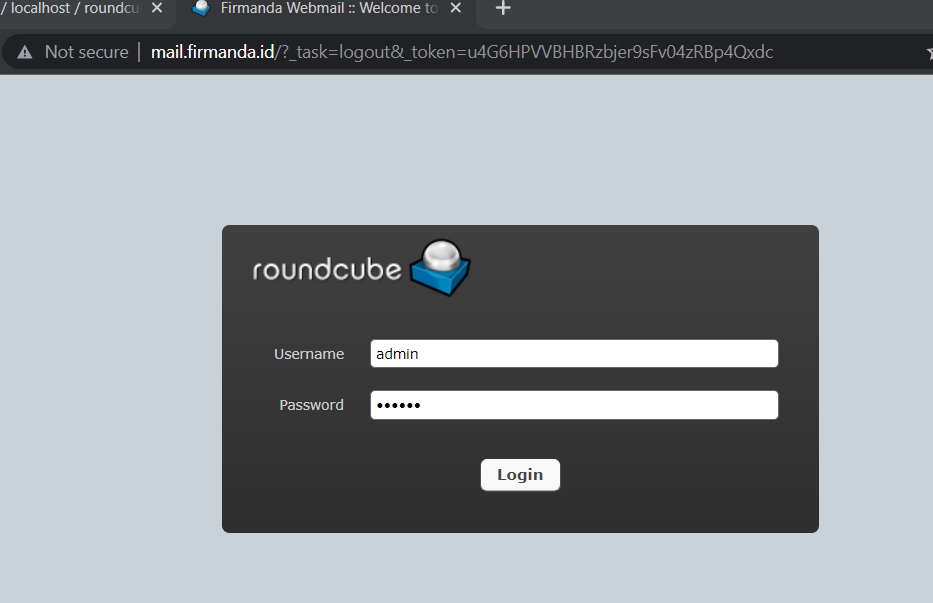
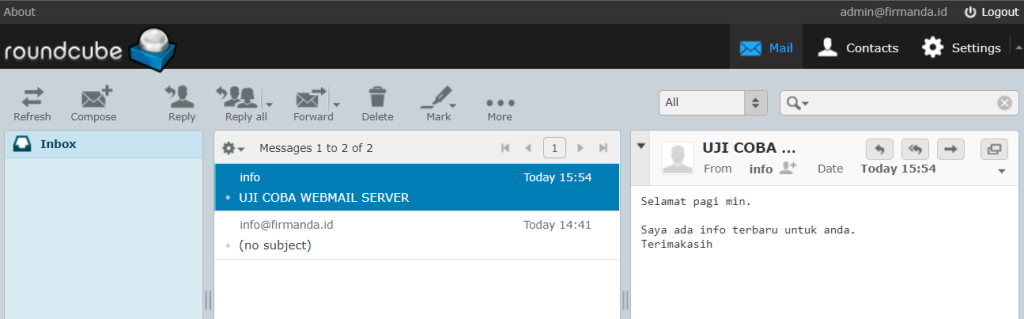
6. Kemudian coba login ke akun admin@firmanda.id untuk melihat apakah pesan tersebut sudah masuk
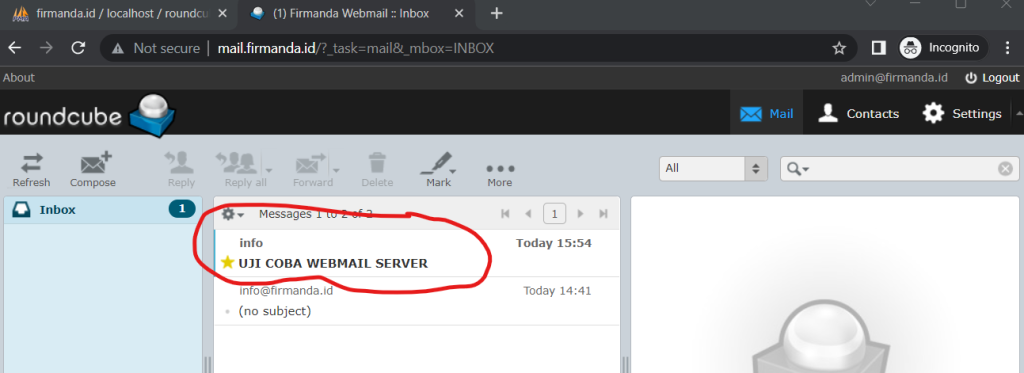
7. Lihat pada menu Inbox, disituakan muncul pesan yang sudah masuk. Jika pesan belum dibaca maka akan tertulis dengan tebal.
SELAMAT ANDA TELAH BERHASIL MELAKUKAN INSTALLASI DAN KONFIGURASI WEB MAIL SERVER