

Sebelum melakukan installasi dan konfigurasi mail server, ada beberapa hal yang perlu anda pastikan, yaitu pada debian sudah harus terinstall:
- DNS server dan berjalan dengan baik
- DataBases server dan berjalan dengan baik
Jika 2 hal diatas sudah terpenuhi, maka anda siap melakukan installasi dan konfigurasi mail server. Berikut ini adlah langkah langkah installasi dan konfigurasi mail server pada debian.
Pertama kita perlu membuat subdomain untuk mail server.
1. Login terlebih dahulu sebagai root
eka@192.168.252.1's password:
Linux tkj 4.19.0-21-amd64 #1 SMP Debian 4.19.249-2 (2022-06-30) x86_64

The programs included with the Debian GNU/Linux system are free software;
the exact distribution terms for each program are described in the
individual files in /usr/share/doc/*/copyright.

Debian GNU/Linux comes with ABSOLUTELY NO WARRANTY, to the extent
permitted by applicable law.
Last login: Thu Oct  6 07:47:34 2022 from 192.168.234.2
eka@tkj:~$ su -
Password:
root@tkj:~#
2. Buka konfigurasi zone forward (db.namadomain) pada bind9
root@tkj:~# nano /etc/bind/db.firmanda3. Tambahkan beberapa baris yang berwana biru didalamnya
;
; BIND data file for local loopback interface
;
$TTL    604800
@       IN      SOA     firmanda.id. root.firmanda.id. (
                              2         ; Serial
                         604800         ; Refresh
                          86400         ; Retry
                        2419200         ; Expire
                         604800 )       ; Negative Cache TTL
;
@       IN      NS      firmanda.id.
@       IN      MX  10  mail.firmanda.id.
@       IN      A       192.168.252.1
mail    IN      A       192.168.252.1
4. Selanjutnya simpan file zone forward tersebut dengan perintah CTRL+O dan tutup menggunakan perintah CTRL+X
5. Kemudian buka konfigurasi zone reverse (db.192) pada bind9
root@tkj:~# nano /etc/bind/db.1926. Tambahkan baris berwarna biru pada pada file tersebut
;
; BIND reverse data file for local loopback interface
;
$TTL    604800
@       IN      SOA     firmanda.id. root.firmanda.id. (
                              1         ; Serial
                         604800         ; Refresh
                          86400         ; Retry
                        2419200         ; Expire
                         604800 )       ; Negative Cache TTL
;
@       IN      NS      firmanda.id.
1.252   IN      PTR     firmanda.id.
1.252   IN      PTR     mail.firmanda.id.
7. Selanjutnya simpan file zone reverse tersebut dengan perintah CTRL+O dan tutup menggunakan perintah CTRL+X
8. Restart service bind9 pada debian
root@tkj:~# service bind9 restart9. Cek hasil konfigurasi bind9 menggunakan nslookup
root@tkj:~# nslookup
> mail.firmanda.id
Server:         192.168.252.1
Address:        192.168.252.1#53

Name:   mail.firmanda.id
Address: 192.168.252.1
> 192.168.252.1
1.252.168.192.in-addr.arpa      name = mail.firmanda.id.
1.252.168.192.in-addr.arpa      name = firmanda.id.
> exit

root@tkj:~#
Sampai di sini kita sudah selesai membuat subdomain untuk mail server ki. Langkah selanjutnya adalah menginstall paket aplikasi mail server.
1. Masukkan perintah tersebut untuk menginstall postfix, dovecot-imap dan dovecot-pop
root@tkj:~# apt install postfix dovecot-imapd dovecot-pop3d
Reading package lists... Done
Building dependency tree
Reading state information... Done
The following additional packages will be installed:
dovecot-core libexttextcat-2.0-0 libexttextcat-data liblua5.3-0 libstemmer0d
Suggested packages:
dovecot-gssapi dovecot-ldap dovecot-lmtpd dovecot-lucene dovecot-managesieved dovecot-mysql dovecot-pgsql
dovecot-sieve dovecot-solr dovecot-sqlite dovecot-submissiond ntp ufw procmail postfix-mysql postfix-pgsql
postfix-ldap postfix-pcre postfix-lmdb postfix-sqlite resolvconf postfix-cdb mail-reader postfix-doc
The following NEW packages will be installed:
dovecot-core dovecot-imapd dovecot-pop3d libexttextcat-2.0-0 libexttextcat-data liblua5.3-0 libstemmer0d postfix
0 upgraded, 8 newly installed, 0 to remove and 0 not upgraded.
Need to get 0 B/8,025 kB of archives.
After this operation, 19.3 MB of additional disk space will be used.
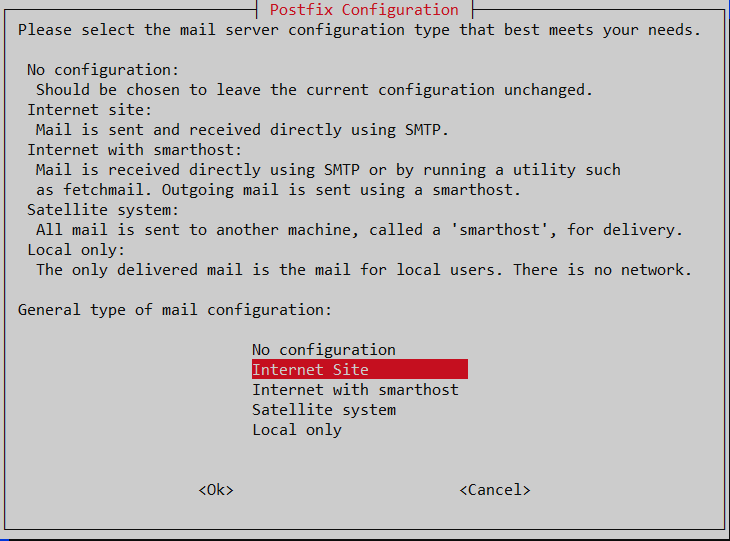
Do you want to continue? [Y/n] y2. Pilih Internet site
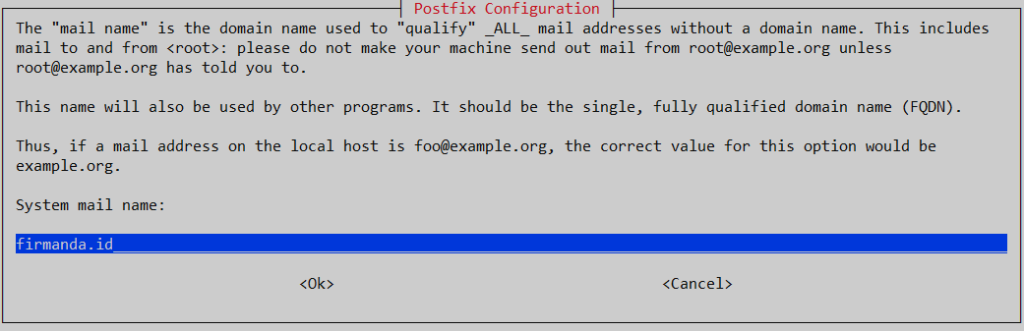
3. Masukkan nama domain kalian
4. Tunggu hingga proses installasi selesai
5. Setelah installasi selesai, langkah selanjutnya adalah melakukan konfigurasi pada postfix. Masukkan perintah berikut ini
root@tkj:~# dpkg-reconfigure postfix6. Pilih internet site
7. Masukkan nama domain kalian
8. Biarkan kosong, langsung enter

9. Tekan enter, atau juga bisa kalian rubah terlebih dahulu (menyesuaikan)
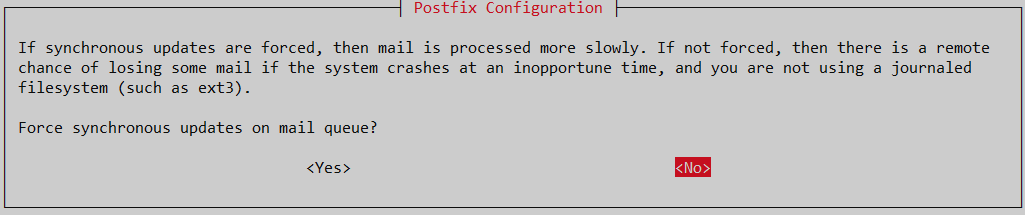
10. Pilih NO
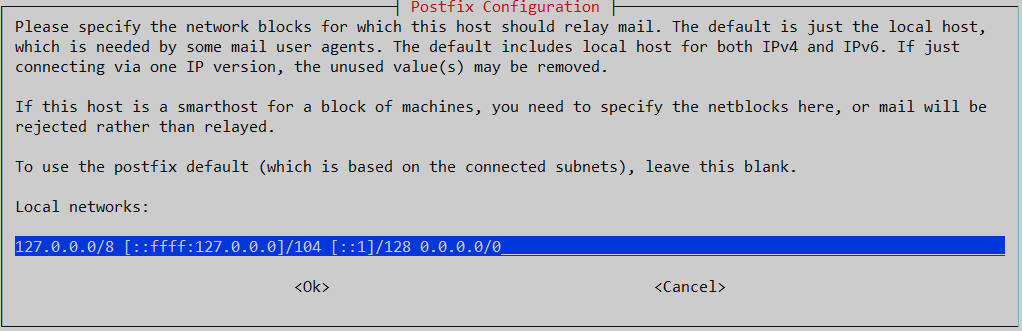
11. Tambahkan ip 0.0.0.0/0
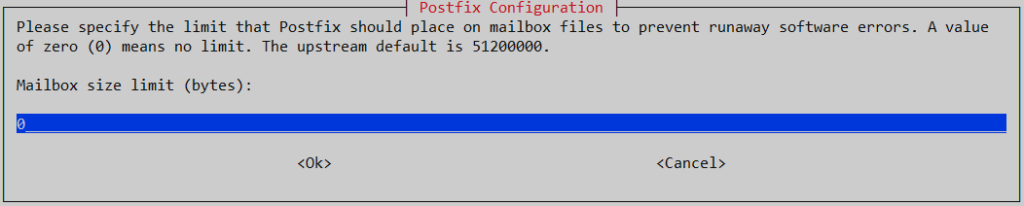
12. Biarkan 0, kemudian enter
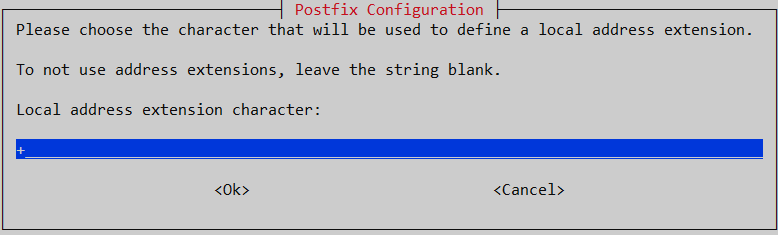
13. Tekan enter
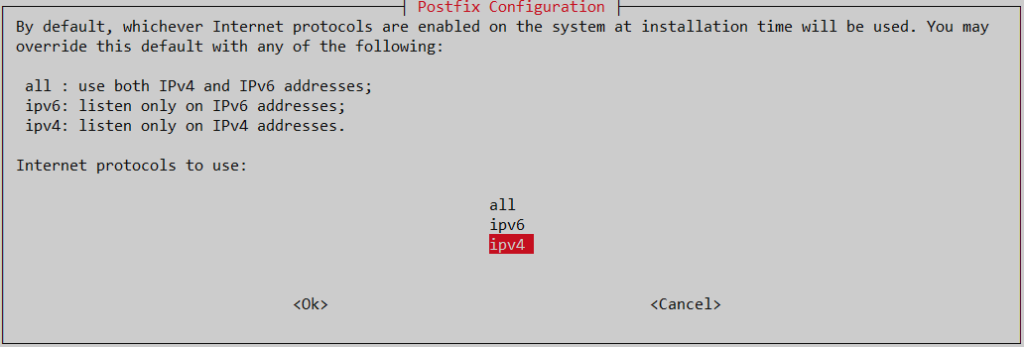
14. Pilih ipv4 kemudian enter
15. Tunggu hingga proses loading selesai
setting synchronous mail queue updates: false
setting myorigin
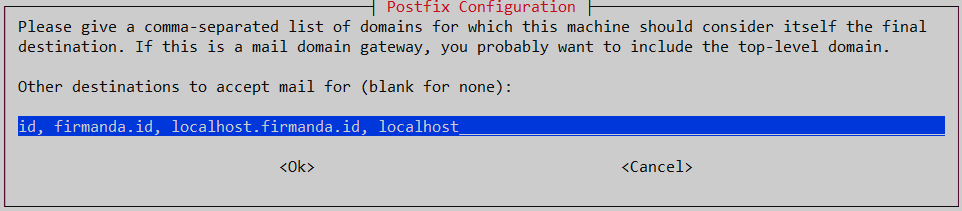
setting destinations: id, firmanda.id, localhost.firmanda.id, localhost
setting relayhost:
setting mynetworks: 127.0.0.0/8 [::ffff:127.0.0.0]/104 [::1]/128 0.0.0.0/0
setting mailbox_size_limit: 0
setting recipient_delimiter: +
setting inet_interfaces: all
setting inet_protocols: ipv4
WARNING: /etc/aliases exists, but does not have a root alias.
Postfix (main.cf) is now set up with the changes above. If you need to make
changes, edit /etc/postfix/main.cf (and others) as needed. To view Postfix
configuration values, see postconf(1).
After modifying main.cf, be sure to run 'service postfix reload'.
Running newaliases
root@tkj:~#16. Buka file konfigurasi postfix, tapi sebelum itu jangan lupa buat backup file konfigurasinya
root@tkj:~# cp /etc/postfix/main.cf /etc/postfix/main.cf.asli
root@tkj:~# nano /etc/postfix/main.cf
17. Tambahkan home_mailbox = Maildir/ di baris paling akhir
smtpd_relay_restrictions = permit_mynetworks permit_sasl_authenticated defer_unauth_destination
myhostname = tkj.tkj
alias_maps = hash:/etc/aliases
alias_database = hash:/etc/aliases
myorigin = /etc/mailname
mydestination = id, firmanda.id, localhost.firmanda.id, localhost
relayhost =
mynetworks = 127.0.0.0/8 [::ffff:127.0.0.0]/104 [::1]/128 0.0.0.0/0
mailbox_size_limit = 0
recipient_delimiter = +
inet_interfaces = all
inet_protocols = ipv4
home_mailbox = Maildir/
18. Tutup dan simpan file tersebut menggunakan perintah CTRL+X
19. Buka file konfigurasi dovecot, jangan lupa buat backup file konfigurasinya
root@tkj:~# cp /etc/dovecot/dovecot.conf /etc/dovecot/dovecot.conf.asli
root@tkj:~# nano /etc/dovecot/dovecot.conf
20. Cari baris listen = * kemudian hilangkan tanda # nya
# A comma separated list of IPs or hosts where to listen in for connections.
# "*" listens in all IPv4 interfaces, "::" listens in all IPv6 interfaces.
# If you want to specify non-default ports or anything more complex,
# edit conf.d/master.conf.
#listen = *, ::
listen = *

# Base directory where to store runtime data.
#base_dir = /var/run/dovecot/
21. Tutup dan simpan file konfigurasi tersebut dengan perintah CTRL+X.
22. Buka file 10-auth.conf
root@tkj:~# nano /etc/dovecot/conf.d/10-auth.conf23. Cari baris disable_palintext_auth, kemudian rubah yes menjadi no
##
## Authentication processes
##

# Disable LOGIN command and all other plaintext authentications unless
# SSL/TLS is used (LOGINDISABLED capability). Note that if the remote IP
# matches the local IP (ie. you're connecting from the same computer), the
# connection is considered secure and plaintext authentication is allowed.
# See also ssl=required setting.
#disable_plaintext_auth = yes
disable_plaintext_auth = no
23. Tutup dan simpan file konfigurasi tersebut dengan printah CTRL+X
24. Atur lokasi atau letak direktori Mailbox
root@tkj:~# nano /etc/dovecot/conf.d/10-mail.conf25. Cari baris Mail location kemudian ubah konfigurasinya sebagai berikut
# See doc/wiki/Variables.txt for full list. Some examples:
#
mail_location = maildir:~/Maildir
#   mail_location = mbox:~/mail:INBOX=/var/mail/%u
#   mail_location = mbox:/var/mail/%d/%1n/%n:INDEX=/var/indexes/%d/%1n/%n
#
# <doc/wiki/MailLocation.txt>
#
#mail_location = mbox:~/mail:INBOX=/var/mail/%u
26. Tutup dan simpan file tersebut dengan perintah CTRL+X
27. Buat direktori dengan perintah “maildirmake.dovecot /etc/skel/Maildir”. Direktori tersebut digunakan untuk menampung semua email
root@tkj:~# maildirmake.dovecot /etc/skel/Maildir28. Restart service postfix dan dovecot
root@tkj:~# service postfix restart
root@tkj:~# service dovecot restart
Sampai di sini kita sudah selesai melakukan konfigurasi pada Mail server. Selanjutnya tinggal kita tes dengan berkirim email. Sebelum itu kita perlu membuat 2 user baru untuk mencobanya.
1. Buat user pertama dengan nama info
root@tkj:~# adduser info
Adding user `info' ...
Adding new group `info' (1001) ...
Adding new user `info' (1001) with group `info' ...
Creating home directory `/home/info' ...
Copying files from `/etc/skel' ...
New password:tkj123
Retype new password:tkj123
passwd: password updated successfully
Changing the user information for info
Enter the new value, or press ENTER for the default
        Full Name []: info firmanda
        Room Number []:
        Work Phone []:
        Home Phone []:
        Other []:
Is the information correct? [Y/n] y
root@tkj:~#
2. Buat user kedua dengan nama admin
root@tkj:~# adduser admin
Adding user `info' ...
Adding new group `info' (1001) ...
Adding new user `info' (1001) with group `info' ...
Creating home directory `/home/admin' ...
Copying files from `/etc/skel' ...
New password:tkj123
Retype new password:tkj123
passwd: password updated successfully
Changing the user information for info
Enter the new value, or press ENTER for the default
        Full Name []: admin firmanda
        Room Number []:
        Work Phone []:
        Home Phone []:
        Other []:
Is the information correct? [Y/n] y
root@tkj:~#
Setelah selesai membuat 2 user baru kita siap menguji coba mail server. Kita akan mencoba kirim email dari user info ke user admin.
root@tkj:~# telnet localhost 25
Trying ::1...
Trying 127.0.0.1...
Connected to localhost.
Escape character is '^]'.
220 tkj.tkj ESMTP Postfix (Debian/GNU)
mail from: info
250 2.1.0 Ok
rcpt to: admin
250 2.1.5 Ok
data
354 End data with <CR><LF>.<CR><LF>
HALO HALO
TES 123
INI EMAIL PERTAMA KITA
.
250 2.0.0 Ok: queued as D83064290A
quit
221 2.0.0 Bye
Connection closed by foreign host.
root@tkj:~#
Kemudian cek email tersebut apakah sudah masuk pada user admin
root@tkj:~# telnet localhost 110
Trying ::1...
Trying 127.0.0.1...
Connected to localhost.
Escape character is '^]'.
+OK Dovecot (Debian) ready.
user admin
+OK
pass tkj123
+OK Logged in.
stat
+OK 1 403
retr 1
+OK 403 octets
Return-Path: <info@firmanda.id>
X-Original-To: admin
Delivered-To: admin@firmanda.id
Received: from localhost (localhost [127.0.0.1])
        by tkj.tkj (Postfix) with SMTP id D83064290A
        for <admin>; Mon, 17 Oct 2022 14:41:22 +0700 (WIB)
Message-Id: <20221017074131.D83064290A@tkj.tkj>
Date: Mon, 17 Oct 2022 14:41:22 +0700 (WIB)
From: info@firmanda.id

HALO HALO
TES 123
INI EMAIL PERTAMA KITA
.
quit
+OK Logging out.
Connection closed by foreign host.
root@tkj:~#
SELAMAT ANDA SUDAH SUKSES MELAKUKAN INSTALLASI DAN KONFIGURASI MAIL SERVER PADA DEBIAN